Ever craved homemade soft serve that rivals your favorite ice cream shop’s? I’ve got just the treat for you! With the Ninja Creami, you can whip up deliciously creamy soft serve right in your kitchen. No more waiting in line or settling for store-bought varieties that just don’t hit the spot.
Benefits of Making Your Own Soft Serve
When I invested in the Ninja Creami, I quickly discovered the numerous benefits of making my own soft serve ice cream. Not only does creating soft serve at home bring unparalleled convenience, but it also offers a level of customization that simply can’t be found at an ice cream shop. I’m able to experiment with a variety of ingredients and flavors, making each batch a unique creation that’s tailored to my taste buds.
One significant advantage is the control over ingredients. When I make soft serve with the Ninja Creami, I choose exactly what goes into the mix. This means I can accommodate dietary restrictions and preferences, like using non-dairy milks or opting for all-natural sweeteners. It’s perfect for those with allergies or anyone looking to reduce their intake of additives and preservatives.
Additionally, there’s the cost-effectiveness of DIY soft serve. Although the initial investment in an appliance like the Ninja Creami might seem steep, it pays off in the long run. By making my own soft serve, I’m saving money compared to purchasing premium ice cream from specialty shops. The savings are even more noticeable when I’m serving a large group, whether it’s at a family gathering or a casual get-together with friends.
The Ninja Creami also simplifies the process of making soft serve to such a degree that it’s almost impossible to mess up. Its user-friendly design ensures a perfect consistency every time, without the typical fuss of traditional ice cream making methods. This ease of use means more time enjoying my creations and less time cleaning or troubleshooting.
The perks of using the Ninja Creami for homemade soft serve are plentiful. The ability to personalize each batch, along with the health and cost benefits, make it a worthwhile venture for any ice cream enthusiast. The simplicity and convenience just sweeten the deal, making the experience as enjoyable as the end result.
Our Top Pick
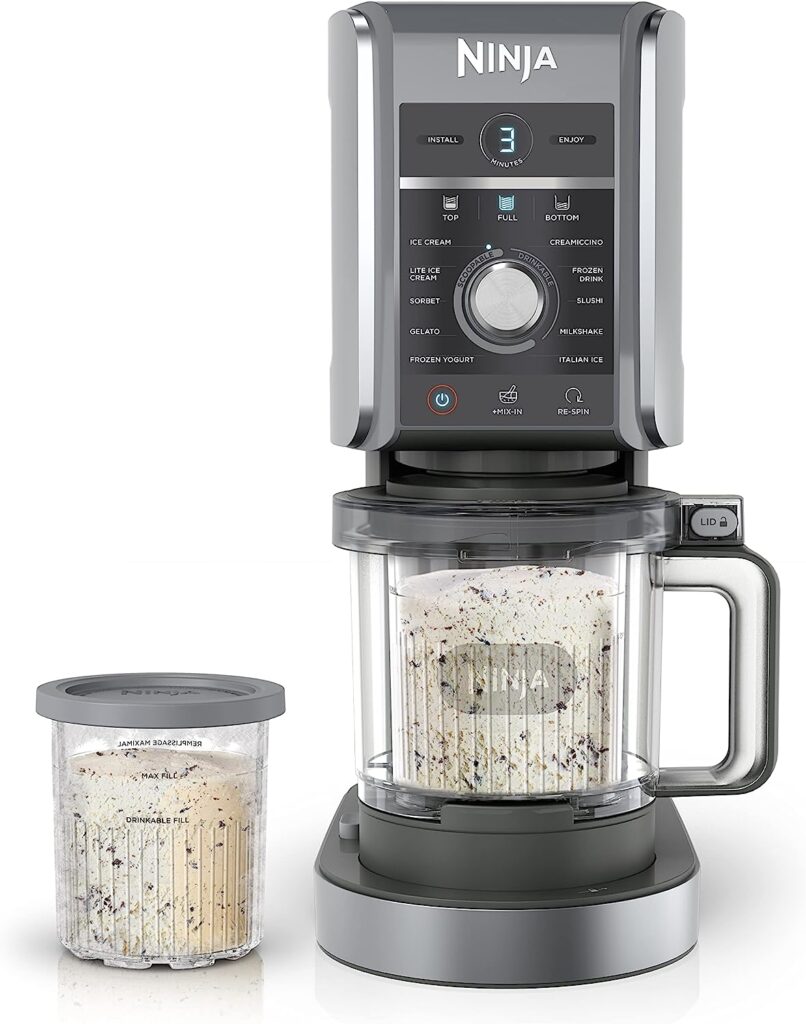
Ninja NC501 CREAMi Deluxe 11-in-1 Ice Cream & Frozen Treat Maker
With the Ninja CREAMi Deluxe, you can turn almost anything into ice cream and so much more. Make classic CREAMi treats like ice cream, sorbet, and gelato, and mix-in masterpieces. And now, make new CREAMi scoopable and drinkable treats like Italian Ice, Slushi, Creamiccino, Frozen Yogurt, and Frozen Drinks right at home.
Check Price on AmazonIntroducing the Ninja Creami
When I first got my hands on the Ninja Creami, I’ll admit I was skeptical. Could a single kitchen appliance revolutionize the way I make soft serve at home? After several batches, I’m convinced that it does precisely that. This innovative device takes the guesswork out of creating the perfect soft serve, allowing for both the novice and the seasoned ice cream aficionado to craft delectable treats with ease.
One of the standout features of the Ninja Creami is its versatility. Not only does it produce top-notch soft serve, but it’s also capable of churning out milkshakes, sorbets, and even frozen cocktails. No longer am I tied to the constraints of traditional ice cream makers or the limited options of store-bought varieties. With the Ninja Creami, the possibilities stretch as far as my culinary imagination will take me.
The operation couldn’t be simpler. Even someone who’s never tackled homemade ice cream before would find the interface intuitive. Just mix the ingredients, pour them into the provided pint container, freeze, and let the machine work its magic. It uses a unique process of spinning and scraping to aerate the mixture, resulting in that classic soft serve texture that’s both creamy and smooth.
The Ninja Creami stands out from other ice cream makers with its patent-pending Creamify technology. This advanced feature ensures that every spoonful of soft serve feels like a gourmet experience straight from your favorite ice cream shop. And when it comes to dietary restrictions or personal taste, I love that I’m in full control of what goes into my dessert. Whether I’m aiming for keto-friendly options or gearing up for a vegan feast, the Ninja Creami makes it happen with minimal fuss.
Creating a Ninja Creami soft serve recipe begins with knowing your appliance, and trust me, getting to know the Ninja Creami is half the fun. Each batch is an opportunity to explore flavors, textures, and delightful combinations that bring joy to every palate. With the Ninja Creami, I’m not just making ice cream; I’m crafting memories, one creamy scoop at a time.
Choosing the Right Ingredients
When I set out to make the perfect batch of soft serve with my Ninja Creami, I know that selecting high-quality ingredients is crucial. The base of any soft serve is typically composed of milk, sugar, and cream, but the beauty of the Ninja Creami is that you can get creative and substitute these to cater to any dietary preferences or restrictions.
For a classic soft serve, full-fat milk and heavy cream provide the richest texture. These fats are essential as they coat the tiny ice crystals created during the freezing process, which results in that dreamily smooth consistency. If you’re watching your calorie intake or need a dairy-free option, almond milk, coconut milk, or oat milk make excellent alternatives. Just keep in mind that non-dairy milks will generally give a lighter, less creamy texture.
Sweeteners play a key role in soft serve not only by contributing to taste but also by affecting texture. Granulated sugar is commonplace, but don’t hesitate to experiment. Honey, agave nectar, or maple syrup can offer deeper flavors and are perfect for those searching for a natural sweetener. Remember, liquid sweeteners may freeze differently, so you might need to tweak your Ninja Creami settings accordingly.
For a truly gourmet experience, consider infusing your base with real vanilla bean or pure extracts. Quality matters here, as synthetic flavors can’t compete with the complexity of the real thing. Fresh fruit purees, chocolate shavings, or even a few drops of your favorite liqueur can elevate your soft serve to the next level.
Below is a basic list of ingredients that I’ve found to work wonderfully in the Ninja Creami for a traditional soft serve:
- Full-fat milk or a dairy-free alternative
- Heavy cream or a vegan substitute
- Sweetener of choice, granulated sugar recommended for first-timers
- Pure vanilla extract or seeds scraped from a vanilla bean
- Optional mix-ins: fruit purees, chocolate, nuts, or liqueurs
Remember, the quality of your soft serve hinges on the quality of the ingredients you choose. Fresh, premium ingredients not only taste better but also improve the overall texture and satisfaction of your frozen dessert. With the Ninja Creami, the possibilities are practically endless. Start with the basics and don’t be afraid to get inventive with flavors and combinations that cater to your personal taste. The results, I’ve found, are always delicious.
Step-by-Step Instructions for Ninja Creami Soft Serve
After selecting my high-quality ingredients, I’m ready to dive into the step-by-step process of making the perfect soft serve with the Ninja Creami. These directions are straightforward and designed to help anyone achieve a creamy and delightful result.
First and foremost, it’s essential to chill the Ninja Creami pint container for at least 24 hours. I make sure it’s completely frozen to set the stage for a well-textured soft serve.
Here’s what I do next:
- Prepare the base: I combine my preferred type of milk, sweetener, and any flavorings in a bowl until the mixture is homogeneous. It’s crucial to dissolve the sweetener completely to avoid any gritty texture.
- Pour into the pint: I carefully transfer the mix into the chilled Creami pint, leaving a little space at the top to allow for expansion as it freezes.
- Freeze the mixture: I seal the pint and place it back in the freezer for at least 24 hours to ensure it’s thoroughly frozen; patience is key here for the perfect consistency.
When it’s time to transform the solid base into soft serve, I remove the pint from the freezer and install it into the Ninja Creami machine.
Here are the next steps I follow:
- Select the program: On the Ninja Creami, I choose the ‘Ice Cream’ function as it churns the mixture slowly, incorporating air and breaking up ice crystals for that signature soft serve texture.
- Check consistency: Once the cycle completes, I’ll examine the texture. If it’s too thick, I’ll use the ‘Re-spin’ feature. It’s an extra step that can make all the difference in achieving that smooth, creamy finish.
Remember, the ingredients you choose and the exactness of these instructions together play a critical role in your final product. I’ve always found that attention to detail and a bit of experimentation go a long way in crafting the ideal batch of Ninja Creami soft serve.
Experimenting with Flavors and Mix-Ins
After you’ve mastered the basics of your Ninja Creami and you’ve got the hang of turning that solid base into silky smooth soft serve, it’s time to get creative with flavors and mix-ins. One of the joys of making your own ice cream is the freedom to tailor it to your exact taste.
I like to start by infusing the milk base with different flavors. Vanilla and chocolate are classic choices, but don’t stop there. Lavender, mint, or even earl grey tea can offer a sophisticated twist to your soft serve. Be sure to steep your flavorings well, thus allowing every ounce of milk to absorb all that aromatic goodness.
For the mix-ins, this is where you can really let your imagination run wild:
- Chopped nuts provide a delightful crunch
- Swirls of caramel or fudge make each bite decadent
- Fresh berries or chopped fruit add a refreshing touch
- Cookie crumbles bring a nostalgic chew to your soft serve
- Sprinkles because, let’s face it, they make everything more fun
Timing is crucial, though; you’ll want to add these extras at the right moment. For most mix-ins, wait until your Ninja Creami has done its magic and the soft serve is folded into a creamy texture. Then, use the ‘Mix-in’ function to incorporate your chosen additions without crushing them completely.
Bear in mind, the size of your mix-ins matters. Larger pieces might struggle to blend well, so I recommend chopping everything into bite-sized goodness. This ensures an even distribution throughout the soft serve, guaranteeing a bit of ecstasy in every spoonful.
Don’t be afraid to experiment with unconventional combinations either. Sometimes the best flavor profiles come from the wildest experiments. What may seem like an odd pairing can end up being a match made in frozen dessert heaven. Just remember, the Ninja Creami is your canvas, and the flavors and mix-ins are your palette. Let your taste buds lead the way and enjoy the process of discovery and creation. Keep tweaking, tasting, and most importantly, enjoying every step of your culinary adventure.
Tips for Achieving the Perfect Creaminess
When crafting the ultimate soft serve using the Ninja Creami, I’ve learned a few tricks to ensure that every batch comes out with optimal creaminess. It’s all about understanding the machine’s capabilities and the ingredients’ interactions.
Firstly, temperature plays a key role. Always start with a frozen base. The base should be completely solid before processing it in the Ninja Creami. I’ve found that a freezing time of 24 hours typically yields the best results, as anything less may result in a texture that’s too soft or even soupy.
Fat content is another critical factor for achieving that sought-after smoothness. A higher fat content in the base tends to lead to creamier results. For example, using full-fat cream in your base can often make a marked difference compared to lower-fat options. Yet, don’t shy away from experimenting with dairy alternatives like coconut milk, which can offer a similar richness.
Remember to pace yourself when using the Creami. If the mixture isn’t creamy enough after the first cycle, resist the urge to immediately put it through another. Let the base rest for a few minutes to allow any larger ice crystals to melt slightly, then run it through the machine again. This little pause can improve texture significantly.
Here’s a quick snapshot of the key points:
- Ensure base is completely frozen (24 hours recommended)
- Use ingredients with higher fat content for creaminess
- Allow resting time between cycles if needed for improved texture
Finally, the Creami’s ‘Creamify’ process is not to be underestimated; it’s designed to break down ice crystals and whip air into the base, transforming it into that irresistible soft serve. Monitor the texture after each cycle, using the Creamify feature until the desired consistency is achieved. Don’t forget, patience and attention to detail are your allies in the quest for the perfect creamy delight!
With these tips in hand, you’re well on your way to becoming a master of the Ninja Creami, crafting indulgent, creamy soft serve that’s tailored to your personal taste preferences. Enjoy the process and watch as your homemade soft serve becomes the highlight of your dessert repertoire.
Serving and Enjoying Your Homemade Soft Serve
Once you’ve mastered the Creamify process with your Ninja Creami, serving your homemade soft serve becomes an art in itself. Presentation is key and I’ve found that the right dish can truly enhance the experience. Opt for chilled bowls or classic ice cream cones to keep your soft serve at the perfect temperature a little longer. Remember, homemade soft serve can be softer than the store-bought variety, so it’ll start to melt a bit quicker.
Topping-wise, the sky’s the limit. Here are a few personal favorites to create a delightful treat:
- A drizzle of warm chocolate sauce
- A sprinkle of crushed nuts for a satisfying crunch
- Fresh berries for a tangy contrast
- Whipped cream for added richness
If you’re serving a crowd, consider setting up a toppings bar. It’s a fun way for guests to customize their desserts and engage with the flavors you’ve created. Just be sure to keep cold toppings refrigerated and hot toppings warm until it’s time to serve.
For those who enjoy a little textural contrast, mix in ingredients such as mini chocolate chips or cookie crumbles during the last cycle of the Creamify process. This step introduces an unexpected crunch that pairs beautifully with the creamy consistency of your soft serve.
Imagine digging into a perfectly swirled, decadently creamy creation that’s been customized to your preferences. The experience is not only about indulging in the treat but also about savoring the fruits of your effort. Take a moment to appreciate the smooth, rich texture and the way the flavors you’ve chosen meld together beautifully with each bite.
The versatility of the Ninja Creami means I can constantly experiment with different recipes and serving ideas, keeping the experience fresh and exciting each time. Whether I’m enjoying a scoop on a sunny afternoon or as a sweet ending to a meal, it’s always a delightful experience that’s just as enjoyable as the process of making it.
Conclusion
I’ve shared my secrets to mastering the art of soft serve with the Ninja Creami. Remember that patience is key—taking the time to freeze your base thoroughly and allowing for rest between cycles will make all the difference. Don’t be afraid to get creative with your mix-ins and toppings to make each bowl uniquely yours. With the Ninja Creami, you’re not just making dessert; you’re crafting an experience. So go ahead, indulge in the creamy goodness you’ve whipped up—it’s a treat well deserved!
Frequently Asked Questions
What is the ideal freezing time for a base before using the Ninja Creami?
The ideal freezing time for a base is 24 hours to ensure it’s completely frozen, which is crucial for achieving creaminess.
How important is the fat content in making soft serve with the Ninja Creami?
Fat content is significant as it contributes to the creamy texture of the soft serve, so choosing the right fat content is important for the desired outcome.
Can I add different ingredients to experiment with my Ninja Creami soft serve?
Absolutely! Experimentation with different ingredients is encouraged to discover personal preferences and unique flavors.
Should I give the Ninja Creami a resting time between cycles?
Yes, allowing resting time between cycles can help improve the texture of your soft serve.
What is the ‘Creamify’ process in the Ninja Creami?
The ‘Creamify’ process is a key step in the Ninja Creami that churns the frozen base to achieve the perfect soft serve consistency.
Are there any tips for serving homemade soft serve?
Presentation matters, so consider serving your soft serve with a variety of toppings or mix-ins to enhance flavor and texture.
Is the Ninja Creami versatile in making different frozen desserts?
The Ninja Creami is highly versatile, allowing for constant experimentation, so you can enjoy different treats every time.