Ever dreamt of whipping up your own batch of silky smooth vanilla ice cream at home? I’ve got just the thing for you! With the Ninja Creami, a game-changer in the world of frozen desserts, making ice cream has never been easier or more fun.
My go-to vanilla ice cream recipe is not only delicious but also incredibly simple to make. It’s perfect for those who want to indulge in a classic favorite with a homemade twist. Stick around, and I’ll guide you through each step, ensuring you get that perfect scoop every time.
Why Make Your Own Ice Cream
Creating homemade ice cream with the Ninja Creami isn’t just about indulging in a cool treat; it’s an experience brimming with benefits. Here’s why I love making my own ice cream, and you might too.
First off, control over ingredients is a significant perk. When I whip up my own batches, I know exactly what’s going into them. This means no preservatives, artificial flavors, or strange chemicals—just pure, natural goodness. Tailoring recipes to dietary needs becomes a breeze, whether you’re aiming for low-sugar, dairy-free, or keto-friendly options.
Moreover, flavor customization is practically limitless. Ever craved a unique ice cream blend that you can’t find in stores? That’s where your creativity with the Ninja Creami shines. Mix in seasonal fruits, exotic spices, or even your favorite cookies to create a customized flavor that’s all your own.
Here are some compelling reasons I’ve discovered:
Our Top Pick
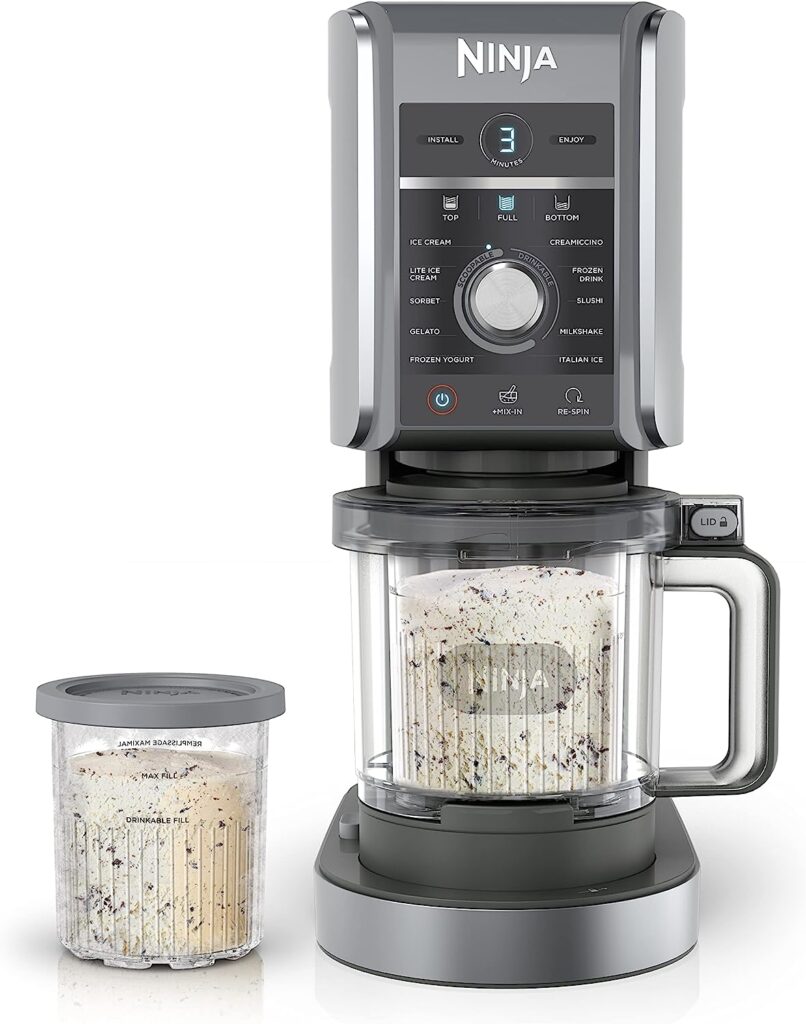
Ninja NC501 CREAMi Deluxe 11-in-1 Ice Cream & Frozen Treat Maker
With the Ninja CREAMi Deluxe, you can turn almost anything into ice cream and so much more. Make classic CREAMi treats like ice cream, sorbet, and gelato, and mix-in masterpieces. And now, make new CREAMi scoopable and drinkable treats like Italian Ice, Slushi, Creamiccino, Frozen Yogurt, and Frozen Drinks right at home.
Check Price on Amazon- Freshness: Store-bought ice cream can’t match the taste of freshly churned. The difference is like night and day.
- Fun Family Activity: Making ice cream can be a bonding experience. I’ve spent countless delightful afternoons with family turning simple ingredients into frozen treats.
- Waste Reduction: You’ll also be reducing food waste. Have overripe bananas or berries on the brink? Toss them into your ice cream base for a zero-waste dessert.
- Cost-Effective: Over time, making your own ice cream can save money, especially if you have a regular craving for gourmet brands.
By taking the reins on your ice cream making, you’re not just satisfying sweet tooths; you’re adopting a healthier and potentially more conscious lifestyle. And with the Ninja Creami, the process is so straightforward that it’s hard to go back to store-bought ice cream once you’ve tasted the fruits of your own labor. Now, let’s get into the thick of making that unbeatable vanilla ice cream recipe.
Introducing the Ninja Creami
When I began my ice cream-making journey, I couldn’t help but rave about the Ninja Creami. It’s a revolutionary gadget that’s taken the homemade ice cream game by storm. Unlike traditional ice cream makers, the Ninja Creami stands out for its innovative approach to churning out creamy, dreamy treats.
Here’s the scoop on what makes the Ninja Creami a must-have in any ice cream aficionado’s kitchen:
- Versatility: Not only does it make sumptuous vanilla ice cream, but it’s also a wizard with sorbets, milkshakes, and even frozen yogurts.
- Speed: The process is rapid, transforming ingredients into frozen delights in just minutes.
- Ease of Use: The intuitive controls mean there’s no steep learning curve. Even novices can whip up their favorite flavors without a hitch.
I have to emphasize the convenience factor. With the Ninja Creami, you don’t have to pre-freeze bowls for hours. It uses a unique creamify technology that works with pint-sized containers, making it easier to store multiple flavors in your freezer.
The design of the Ninja Creami also ensures that cleanup’s a breeze. Most parts are dishwasher safe, which saves you time and makes the experience hassle-free. This is a game-changer for me, as I don’t want to spend more time cleaning than enjoying my ice cream.
Moreover, when I talk about customization, the Ninja Creami truly shines. Whether you’re looking to cut down on sugar, avoid certain allergens, or infuse your batch with exotic flavors, you have complete control over what goes into your mix. Your vanilla ice cream isn’t just homemade; it’s personalized.
Investing in this device means you’re on the road to enjoying healthier, more sustainable, and absolutely delicious homemade ice cream. And the best part? You’re only limited by your imagination. Whether you’re a purist sticking to vanilla or an experimentalist eager to try out quirky combinations, the Ninja Creami could very well be your new best friend in the kitchen.
The Creami Vanilla Ice Cream Recipe
When I set out to make vanilla ice cream using the Ninja Creami, I always start by gathering the highest quality ingredients; because in homemade ice cream, every single component shines through. For a batch of rich, creamy vanilla ice cream, I’ll need:
- Heavy cream
- Whole milk
- Sugar
- Pure vanilla extract
- Pinch of salt
Here’s how I make sure the vanilla ice cream turns out perfect every time. In a mixing bowl, combine one cup of heavy cream with one cup of whole milk. Then I add three-quarters of a cup of sugar, a generous tablespoon of pure vanilla extract, and a small pinch of salt. I whisk these ingredients together until the sugar is completely dissolved.
Once the mix is ready, I pour it into the Ninja Creami pint container and secure the lid. It goes straight into the freezer, and I let it freeze for 24 hours to ensure it’s solid throughout. The beauty of the Ninja Creami is that I don’t need to pre-freeze the bowl like with traditional ice cream makers.
The next day, I take the frozen pint and place it into the Ninja Creami. With the press of a button, I select the ice cream function and let the machine work its magic. It takes minutes for the Creami to churn the frozen mix into a smooth and luscious ice cream.
Once the cycle is complete, I can’t resist taking a spoon and diving right in. But, if I’m looking for a firmer consistency, I’ll transfer the ice cream back into the freezer for a quick chill. It’s astounding how the texture rivals that of store-bought premium brands, and knowing I’ve made it from scratch makes the experience even more gratifying.
The Ninja Creami not only simplifies the process but excels at delivering consistent results. Whether I’m serving this vanilla ice cream on its own, with a drizzle of hot fudge, or as the base for a sundae loaded with toppings, it’s always a crowd-pleaser. Making ice cream at home has never been this straightforward, or this delightful.
(KEY POINTS IN BRIEF FORM)
- Gather high-quality ingredients
- Mix heavy cream, whole milk, sugar, vanilla extract, and a pinch of salt
- Dissolve sugar completely
- Freeze mixture for 24 hours
Ingredients You’ll Need
Before diving into the magical world of homemade vanilla ice cream, let’s ensure we have all the necessary ingredients on hand. The beauty of making ice cream with the Ninja Creami is the simplicity of the ingredients needed. You won’t require any fancy or hard-to-find items, just a few kitchen staples that work together to create that classic, creamy delight.
High-quality ingredients can make or break your ice cream experience. For this vanilla ice cream recipe, you’ll need:
- Heavy cream: This is the main source of richness and creamy texture. Make sure it’s fresh and cold.
- Whole milk: It balances the fat from the cream, ensuring a smooth consistency without being too heavy.
- Granulated sugar: This sweetens the ice cream and also helps with the texture.
- Pure vanilla extract: The star of the show. Opt for pure vanilla extract over imitation for the best flavor.
- A pinch of salt: This might sound odd, but a little salt actually enhances the sweet flavor of the ice cream.
Here’s a quick rundown of the measurements for each ingredient:
| Ingredient | Measurement |
|---|---|
| Heavy cream | 1 cup |
| Whole milk | ¾ cup |
| Granulated sugar | ⅔ cup |
| Pure vanilla extract | 1 teaspoon |
| Salt | A pinch |
With these ingredients, you’ll whip up a batch that could rival any store-bought brand. Remember, the key to a perfect ice cream is not just in the ratio of ingredients but also in their quality. For instance, using a premium vanilla extract can take your ice cream from good to extraordinary.
Pouring the mixture into the Ninja Creami bowl without any need for pre-freezing simplifies the whole process even further. Make sure everything is thoroughly combined; this will ensure your ice cream has an even flavor and texture once churned. I always like to mix a bit longer than necessary to dissolve the sugar fully, which prevents any graininess in the final product.
Prepping your ingredients and churning them into ice cream is an experience as delightful as enjoying that first spoonful. With no pre-freezing required and a machine that does the heavy lifting, you’re set for ice cream success. Keep everything chilled, measure accurately, and you’ll be enjoying homemade vanilla ice cream in no time.
Step-by-Step Instructions
Making vanilla ice cream with the Ninja Creami is a breeze, and I’m here to guide you through every step of the process. Let’s dive right into creating that smooth, creamy goodness that melts in your mouth.
Prepare the Base
To start off, we’re going to prepare the ice cream base. Simply combine 1 cup of heavy cream, 1 cup of whole milk, 3/4 cup of granulated sugar, 1 tablespoon of high-quality vanilla extract, and a pinch of salt in a mixing bowl. It’s crucial that these ingredients are well-mixed to ensure that the sugar dissolves completely – this is what gives our ice cream its signature creaminess. Once that’s done, pour the mixture into the Ninja Creami pint container. Remember, the quality of vanilla extract makes a huge difference here, so don’t skimp on it.
Freeze the Mixture
Next, we seal the container and place it in the freezer. Wait for it to freeze solid, which typically takes about 24 hours. Unlike traditional ice cream makers, you won’t have to worry about pre-freezing the bowl, thanks to the Ninja Creami’s innovative design. This feature saves time and lets me be spontaneous with my dessert-making.
Blend to Perfection
After the waiting game, now it’s time for the fun part: blending. Insert the frozen pint into your Ninja Creami, select the ‘Ice Cream’ function, and let the machine work its magic. The spinning blade technology will churn the frozen base into smooth, creamy ice cream within minutes. If you prefer a softer consistency, feel free to run the machine for a second cycle. There’s nothing like watching (and hearing) the transformation from solid to sumptuous.
Through these easy steps, you’re not just making a dessert; you’re crafting an experience. Each spoonful of the vanilla ice cream reflects long-standing tradition meeting modern innovation in your kitchen. And with the Ninja Creami, that experience is just moments away from delighting your taste buds.
Tips for Perfect Results
When I’m striving for that silky smooth, perfectly crafted bowl of vanilla ice cream, there are a few tips and tricks I’ve uncovered over the years that can make a world of difference. Sharing these might just elevate your Ninja Creami vanilla ice cream to the level of gourmet dessert parlours.
First off, temperature plays a critical role. Ensure all ingredients are cold before you start mixing them together. This isn’t just a whimsical suggestion but a fundamental step to prevent ice crystals from forming, which can affect the texture of your ice cream. You’re looking for a creamy consistency, not a crunchy one!
Here’s another nugget of wisdom: be patient with the process. Once you’ve poured the base into the Ninja Creami pint, it needs to freeze solid. And I mean solid. Resist the temptation to rush the process by checking it too early. Generally, this takes about 24 hours, but depending on your freezer, it might vary slightly. Trust me, when it comes to ice cream, good things come to those who wait.
Now let’s talk about blending. The Ninja Creami is a powerhouse, but even powerhouses need a bit of guidance. Start with the preset ice cream function; however, don’t hesitate to run additional spin cycles if the texture isn’t to your liking. Extra cycles can help achieve that dreamy, creamy texture that you’re after. Remember, it’s the little details that make a big impact.
Lastly, customization is key. Once you’ve nailed the basic vanilla flavor, don’t be afraid to experiment. Add-ins like chocolate chips, fruit, or nuts can be folded in after the ice cream has been blended. Think of the vanilla base as your canvas and you’re the artist—get creative!
By keeping these tips in mind, you’re well on your way to crafting the perfect Ninja Creami vanilla ice cream. Just remember, ice cream making is as much an art as it is a science. Now, let’s move on to tackling the next steps in our ice cream adventure.
Creative Variations to Try
Once you’ve mastered the basic vanilla ice cream recipe in your Ninja Creami, it’s time to get creative. The beauty of homemade ice cream is that you can experiment with a multitude of flavors and mix-ins. I’ll share some of my favorite twists that’ll make your vanilla ice cream stand out.
If you’re a chocolate lover, consider adding chocolate chips or a swirl of chocolate syrup just before the final blend. The contrast between the smooth vanilla and rich chocolate will provide a delightful taste experience that’s hard to beat. For a fruitier version, toss in frozen berries like strawberries or raspberries during the last few minutes of blending. These berries not only contribute to a refreshing taste but also add a pop of color and texture to your ice cream.
Those with a penchant for something more exotic might enjoy a sprinkle of cinnamon or a dash of espresso powder. The warm notes of cinnamon pair beautifully with vanilla and espresso powder adds a sophisticated touch that coffee aficionados will appreciate.
Here’s a table of suggested add-ins and when to incorporate them:
| Add-In | Quantity | Ideal Time to Add |
|---|---|---|
| Chocolate Chips | 1/2 Cup | Prior to Final Blend |
| Berry Mix | 3/4 Cup | Last 2 Minutes of Blending |
| Cinnamon | 1 Teaspoon | Mix In Before Freezing |
| Espresso Powder | 1/2 Teaspoon | Mix In Before Freezing |
Don’t forget about nuts; pecans, almonds, or walnuts can be a crunchy counterpart to your creamy creation. Toss them in with your other ingredients for a surprise texture that is sure to delight. Finally, for those who like a bit of everything, go for a trail mix version – a little salty, a little sweet, and utterly satisfying.
Making your own ice cream is all about personalizing your dessert experience. By using the Ninja Creami, you’re able to transform a simple vanilla base into a sensational treat that’s tailored to your taste. So don’t hesitate to mix, match, and discover your ideal mix-in combo.
Conclusion
I’ve walked you through the simplicity and creativity of making vanilla ice cream with the Ninja Creami. Remember, the secret’s in the quality of your ingredients and the precision of your process. Now that you’re armed with tips for perfect consistency and flavor, it’s your turn to take the reins. Whether you stick to classic vanilla or venture into a world of mix-ins, your homemade ice cream is bound to be a hit. So grab your Ninja Creami and let your ice cream dreams churn into reality. Don’t forget to share your delicious creations and your own twist on this creamy delight!
Frequently Asked Questions
What ingredients do I need for making vanilla ice cream in the Ninja Creami?
You will need heavy cream, whole milk, sugar, vanilla extract, and a pinch of salt.
Is it necessary to pre-freeze the bowl when using the Ninja Creami?
No, pre-freezing the bowl is not necessary when using the Ninja Creami.
How can I ensure the best texture for my homemade ice cream?
For the best texture, it’s important to use fresh ingredients and follow the instructions carefully, including proper blending techniques and freezing times.
Can I customize my Ninja Creami vanilla ice cream?
Yes, you can customize the ice cream by adding mix-ins such as chocolate chips, fruit, cinnamon, espresso powder, nuts, or trail mix.
When should I add mix-ins to my Vanilla Creami ice cream?
It’s best to add mix-ins like chocolate chips or fruit during the last few minutes of blending or fold them in after the ice cream is done blending.
How can experimenting with different flavors enhance my ice cream-making experience?
Experimenting with different flavors and mix-ins allows you to personalize your dessert and can lead to discovering your ideal ice cream flavor combination.